Here’s a neighborly, step-by-step guide to how to draw your garden, build the plan, and bring it to life in your backyard. I’ll walk you through every phase so you can sketch with confidence, clarity and creativity.

1. Start With Measuring & Mapping Your Space
Before any pencil hits paper, we need to understand what you have to work with.
Measure the perimeter
Walk the edges of your space and note the dimensions: the width, the depth, any fences, walls, or permanent features. Use a measuring tape or laser measure. One guide says mapping the size and shape of your garden—perimeter, beds, trees—is the starting point.
Note existing features
Mark where trees sit, where the house meets the yard, where fixed hardscape (patios, driveway, shed) exists. These are the “givens” your drawing must include. How to Keep Deer Out of Your Garden.
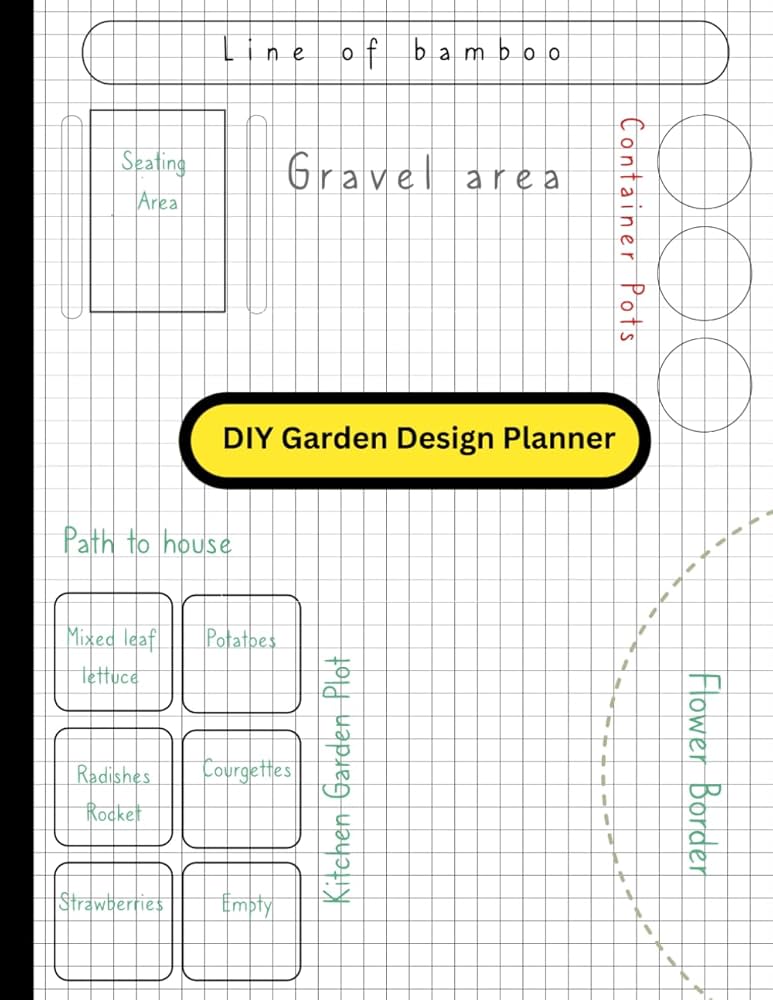
Make your base map
On graph paper or using a drawing tool, sketch the outline of your garden space to scale (for example: 1 inch = 3 feet). Add the house line, fences, major trees, and elements you intend to keep.
2. Do a Site Inventory & Understand Conditions
The best gardens respond both to the space and to its conditions (sun, shade, wind, soil).
Sketch in light and shade
Which areas get full sun (6+ hours), which get part shade, which are mostly shady? This affects what you can plant—and where you’ll draw those areas.
Note other conditions
Drainage (does water pool?), level vs sloped ground, existing soil quality, wind direction, sight-lines from your house. These influence the shapes you draw, the bed placement, and how small lemon tree functional your layout will be.
Make a wishlist
Ask: What do we want this garden to do? Do we want vegetable beds? A sitting area? A path leading somewhere? A place for kids or pets? Having this in mind helps when you draw.
3. Sketch the Layout: Paths, Features, Zones
Now we move from mapping what is, to sketching what could be.
Mark circulation & paths
Think about how you move through your garden. Where do you want to walk? Where will you stand, sit, plant? Draw in main and secondary pathways. A good flow makes a garden feel comfortable and readable.
Place focal features
Do you want a bench, a water feature, a tree you’ll highlight, a vegetable bed? Sketch in circles or boxes for these features (“bubbles”) so you can see how they interact with the space.
Define zones
Divide your garden into functional zones: seating area, play area, planting area, service zone (tools/compost), maybe screening. These zones make up the party switch drawing.
Iterate your plan
Don’t expect the first sketch to be perfect. Pull out tracing paper or redraw variations. Some designers make many versions before settling.
4. Draw the Hardscape & Structure
With layout settled, now draw the “bones” of your garden—the hard elements that don’t change season-to-season.
Add patios, decks, walls, fences
These are the fixed shapes. Use straight-edge lines and clearly differentiate them from planted beds in your sketch.
Define bed edges
Curved or straight? Will your planting bed have a formal rectangle or a sweeping curved line? Sketch the edge line. Then you’ll draw the bed inside it.
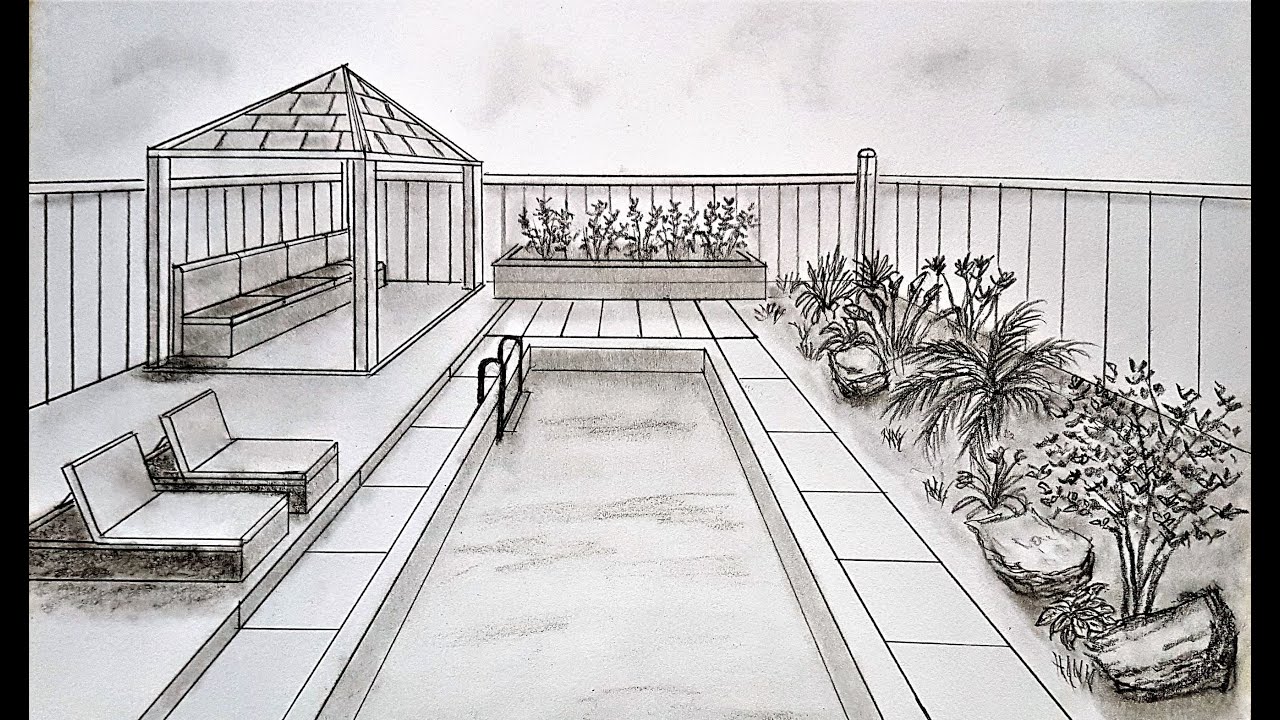
Elevation & perspective (optional)
If you like, you can draw a perspective view (looking from one point) to visualize the garden in 3D. This helps if you’ll show the design to somebody else.
5. Sketch the Planting – Big to Small
Now for the fun part: representing the plants and planting areas in your drawing.
Planting structure: layers
Start with your structural plants—trees, large shrubs, focal specimen. Then why did chloe leave dance moms move to medium shrubs, perennials, groundcovers. This layered approach makes the garden look intentional.
Use simple symbols
On your drawing, trees might be large circles, shrubs cloud-shapes, perennials small circles or dots. Don’t worry about botanical accuracy yet—just represent size and placement.
Consider mature size
Sketch where plants will be when mature. That prevents overcrowding later.
Add texture and rhythm
Your drawing should suggest variety—plant groupings, repetition, swathes of colour, different leaf textures. Even if simple, outline grouping patterns.
6. Review & Refine the Drawing
Take a step back. You’re almost done drawing, but refining improves clarity and correctness.
Check scale & proportions
Does everything look well-balanced? Are pathways wide enough? Are beds reachable? Does the drawing reflect what you measured?
Consider views & access
Stand at the points your garden will be viewed from (patio, house window). Does the drawn layout what day is palm sunday offer nice sight lines or does something block the view? Adjust as needed.
Finalise lines
Once you’re happy, you might ink the drawing or use a darker pencil. Make one “final” version, preserving previous sketches for comparison/wiser decisions.
7. Take Your Drawing Into Action
Drawing is only the start. Now you turn the sketch into reality.
Use the drawing as a guide during installation
When you dig beds, place plants, lay paths—refer to your layout. The drawing keeps you on track.
Adjust on site as necessary
Sometimes the real world asks for tweaks: big rock you forgot, tree roots, scale feels different. That’s okay—your drawing is a tool, not a rigid rule. You can revise.
Document and track changes
If you make changes while building, mark them on your drawing. That becomes your “as-built” plan and is useful for future planting or maintenance.
8. Tips for Drawing That Make a Big Difference
Here are some extra hacks to make your drawing easier and more effective. Where Are DEWALT Tools Made?
- Use graph paper or a digital grid so your drawing stays to scale.
- Keep a good eraser handy. Drawing is iterative.
- Use tracing paper over your base plan so you can try different layouts without re-drawing everything.
- Use clear symbols and a legend if you plan to share the drawing with others.
- If drawing by hand, draw light pencil first, then go over with pen when finalized.
9. Common Mistakes to Avoid
And because we care, here are pitfalls that many gardeners run into when drawing their garden:
- Ignoring scale — A pathway that looks wide on paper may be too narrow in real life.
- Skipping measurement — If you don’t measure first you’ll be surprised by space constraints.
- Planting too big too soon — Not considering mature plant size leads to overcrowding.
- Laying out everything without thinking flow — Paths and movement matter; don’t forget them.
- Finalizing the drawing and never revisiting during build — On-site adjustments are normal; skip them at your peril.
10. Your Drawing, Your Garden, Your Story
You’re not just making a sketch. You’re telling a story: one of how your backyard becomes a place you use, enjoy, live in. When you draw your garden with intention, you build a roadmap for that story.
Your drawing becomes a bridge between your dream and your real space. One line for the path you’ll stroll along. One shape for the shrub that will bloom next spring. One circle for the table where you’ll sit and sip lemonade.
So pick up that pencil. Measure. Sketch. Refine. Let your drawing lead the way toward a garden that’s yours—personal, functional, beautiful.
You’ll not only have a plan on paper — you’ll have a plan in your mind and memory. And when you start digging, planting, sitting, you’ll already know the garden you intended.
Here’s to the drawing you’ll make — and the garden it will become.